Posts

Showing posts from December, 2012

How to add Button to the Buttom of Layout

Use Relativ layout and add the button with this attributes The ParentBotton "true" allocate at to the bottom of the layout.

Android Manifest File

It is the main Configuration file of Android Project. Is automatically created with every android project. In this file we configure different type of appliction setting. First We use element. In this tag we take permission of others appliction are services which we want to use in our appliction. if we want to use SMS sending in our project than we used SMS permission appliction element contain all those element wchich we define in our project like activity servieces and receiver. The default appliction is look like this

How to store data in share preferences in android

Share Preferences are used for storing some data, like font size, background color are array data. Its also store float , integer, string and Boolean values. Following are the example of Share Preference read and writing. private SharedPreferences myPrefs; private SharedPreferences.Editor editor; /////////////////////////// object initialization   myPrefs = this.getSharedPreferences("myPrefs", MODE_WORLD_READABLE);          editor=myPrefs.edit();  ////////////// store data in string value  editor.putString("value", "android hello word programming");    editor.commit(); //// read the store data from string value  myPrefs = this.getSharedPreferences("myPrefs", MODE_WORLD_READABLE);              String aString=myPrefs.getString("value", "not retrieved");              Toast.makeText(getApplicationContext(), "data.."+aString, Toast.LENGTH_LONG).show();            

Thread in Android

By default every android application is separate thread which called main thread. If any one want to run any work which take more than ten second and run at in the main thread . then your application must to terminated unexpectedly . To avoid this problem you must create second thread and do the long running process in this separate thread. when process in come to end then its result are now passed to main thread for user.Then your Application will be run smoothly. Android used different type of threads some are given below. Timer () ( for repeated task again and again) Thread and Handler (Both repeated and long running program) Service  (most preferable for long and background task )

Blocking Incomming Calls in Android Smart Phone

Image
We want to blocks all incomming calls in android phone. Create new project and extand it main class from BroadCast Receiver. public class Blocker extends BroadcastReceiver { private ITelephony telephonyService; private String incommingNumber; private String incommingName=null; @Override public void onReceive(Context context, Intent intent) { // TODO Auto-generated method stub Bundle b = intent.getExtras(); String state = b.getString(TelephonyManager.EXTRA_STATE); if ((state != null)&& (state.equalsIgnoreCase(TelephonyManager.EXTRA_STATE_RINGING))) {  TelephonyManager telephony = (TelephonyManager)  context.getSystemService(Context.TELEPHONY_SERVICE); try { Class c = Class.forName(telephony.getClass().getName()); Method m = c.getDeclaredMethod("getITelephony"); m.setAccessible(true); telephonyService = (ITelephony) m.invoke(telephony); telephonyService.endCall(); } catch (Exception e)    {    e.printStackTrace();   } } } Manifest File

Timer in Android

public class Timer extends Activity { private TextView tv; private int cc=0; private java.util.Timer timr; @Override public void onCreate(Bundle savedInstanceState) { super.onCreate(savedInstanceState); setContentView(R.layout.activity_timer); tv=(TextView) findViewById(R.id.textView1); timr=new java.util.Timer(); timr.scheduleAtFixedRate(new TimerTask() { @Override public void run() { // TODO Auto-generated method stub TimerMethod(); } }, 0, 1000); } public void TimerMethod() { this.runOnUiThread(new Runnable() { public void run() { // TODO Auto-generated method stub tv.setText("vaue.."+cc); cc++; if(cc>=10) timr.cancel(); } }); } }

How to read all contacts of android phone

In this tutorial we simply display the name of all Contacts which are saved at our phone . package com.example.contactslist; import android.net.Uri; import android.os.Bundle; import android.provider.ContactsContract; import android.provider.MediaStore; import android.app.ListActivity; import android.database.Cursor; import android.view.Menu; import android.widget.Toast; public class Contacts extends ListActivity { private String name; private String phone; @Override public void onCreate(Bundle savedInstanceState) { super.onCreate(savedInstanceState); setContentView(R.layout.activity_contacts); Uri all=ContactsContract.Contacts.CONTENT_URI; String[] projection=new String[] {ContactsContract.Contacts._ID, ContactsContract.Contacts.DISPLAY_NAME,ContactsContract.Contacts.HAS_PHONE_NUMBER}; Cursor cursor = managedQuery(all, projection, null, null, null); startManagingCursor(cursor); while (cursor.moveToNext()) { // String id=cursor.getString(cursor.getColumnInd

Content Provider to load all images in Set as wallpaper in Android

Image
res/layout/main.xml sec/java/mainactivity.java ....package com.example.allimagespath; import java.io.File; import java.io.FileInputStream; import java.io.FileNotFoundException; import java.io.IOException; import java.io.InputStream; import java.util.ArrayList; import android.net.Uri; import android.os.Bundle; import android.provider.MediaStore; import android.app.Activity; import android.app.WallpaperManager; import android.content.ContentResolver; import android.content.Context; import android.database.Cursor; import android.graphics.Bitmap; import android.graphics.BitmapFactory; import android.util.Log; import android.view.Menu; import android.view.View; import android.widget.Button; import android.widget.ImageView; import android.widget.Toast; public class MainActivity extends Activity { ArrayList mStringList= new ArrayList (); private int i=0; private ImageView iv; String[] mStringArray ; private Button btnWall; private ContentResolv

Customized Query to access Contents of android phone

Cursor cursor = managedQuery(Uri, null, null, null, null); First parameter are used for what you want to access there are built-in Uri used to access desired contents. Browser.BOOKMARKS_URI  Browser.SEARCHES_URI CallLog.CONTENT_URI MediaStore.Images.Media.INTERNAL_CONTENT_URI MediaStore.Images.Media.EXTERNAL_CONTENT_URI  Settings.CONTENT_URI  2. Second parameter is called projection. In this parameter of managQuery we want to retrieve how many columns . For Images String[] projection = { MediaStore.Images.Thumbnails._ID, MediaStore.Images.Media.DATA ,MediaStore.Images.Thumbnails.DATA} Cursor cursor = managedQuery(Uri, projection, null, null, null); For Contact Uri contacts=Uri.parse("People.CONTENT_URI"); String[]​projection​=​new​String[] ​​​​​​​​​​​​{ContactsContract.Contacts._ID, ​​​​​​​​​​ ContactsContract.Contacts.DISPLAY_NAME, ​​​​​​​​​​​​​ ContactsContract.Contacts.HAS_PHONE_NUMBER}; ​​​​​​​​ Cursor​c​=​managedQuery(contacts,​projection, ​​​​​​​​

Content Provider in Android

An android we used File , Data Base for Stored data permanently. These file and Database are accessible only to its application . Others application and packages can not access this. There fore android provide Content Provider   to shared data among packages and application. Some android shared contents are following Contact Number  Media Storage (audio, videos, and images) Browser bookmarks. That all are built in content providers. We develop  own content provider to extend the base class of content providers. Now we used content provider to access built-in Contents  Fist of all we want to access all all images of Phone which are stored in Sd card. public class MainActivity extends Activity {  private String TAG="android.imges";       @Override     public void onCreate(Bundle savedInstanceState) {         super.onCreate(savedInstanceState);         setContentView(R.layout.activity_main);         Uri Images=Uri.parse("android.provider.MediaStore.Im

Play Audio in Android

There are used Media Player class for playing audio file in android Programmatically . You can play audio file of your resource folder or play any file from Sd Card. Both method are describe below  Playing from resources Playing from res/raw/file.mp3 MediaPlayer player=MediaPlayer.create(PlaySound.this, R.raw.zara_se.mp3); player.start(); If you want to stop the audio use the following if(player!=null) { player.stop(); } Pause audio if(player!=null) { // player is the object of Media player player.pause(); }   Playing from Sd card Now if you want to play any audio file which are stored in Sd Card use the following code . use proper path of your file in setDataSource("sdcard/music/zara_se.mp3") String path="sdcard/music/zara_se.mp3"; MediaPlayer player=MediaPlayer.create(PlaySound.this, R.raw.zara_se.mp3); player.setDataSource(path); player.start();

How to add and remove data from Android Emulator Sd Card

Image
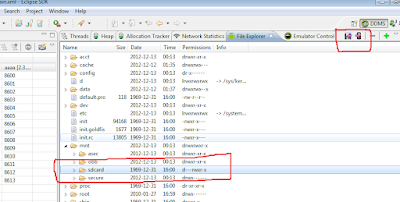
First of all open Eclipse and go to DDMS menu . After that select File Explorer and open Sd card .  Help are given in the following Screen Shot. Now for adding some data like pictures , audios, videos or apps add on the Mobile symbol which are mention in the  following screen shot. Explorer menu will be displayed . Now copy the desired data into your Emulator Sd card. If you want to copy your Sd card data to your PC than Select the second icon which will be displayed for you in file explorer menu .

How to install APK on Android Phone/Emulator from PC

Image
Some time we want to install any APK  on Emulator or Android phone directly form PC . For doing this let study the following step by step procedure. First of all create new AVD from Eclipse and reserved space for Sd Card    2. Now Download Droid Explorer which used for install directly your apk on emulator or connect android phone . http://de.codeplex.com/ .  When you install it required Android SDK location. Browse and select SDK. then your Droid Explorer  installation is complete. 3 Now Run AVD from Eclipse and go to folder where your apk file is stored. Right Click on Apk file and install it. It would  automatically installed on your Emulator. In the above Picture we open Apk file of Android Astro Explorer and open it with Droid Explorer. It will be installed at your active AVD or connected Android Phone. Let see The final Screen Shot of installed Apps using Droid Explorer

Android Content Provider

Content Provider used for  Shared data of Android Mobile  . Which are easily accessible from every Application of Android. Following are the example of Shared data.   Mobile Contacts Browser Bookmarks Media Storage (images, audio and Videos) First of all we studies Built in Content Provider.

How to Develop Android Widget

Image
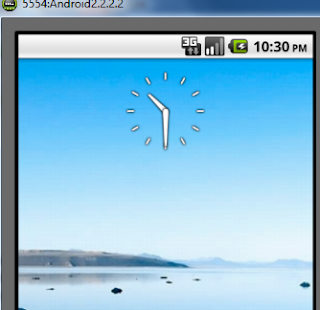
Android Widget Widget are application which are run on home screen for quick access and easily inform you from current situation, like clock widget, weather widget, calender widget and much more like this. Now in this tutorial we want to develop Android Home Screen Widget Analog Clock . Complete tutorials and Source code are in this tutorials . Lest enjoy the Fun ! First Create new Project File>>New>>Android Project>>Project Name and APi Now Open manifest File which are looking like this Now Cut the RED COLOR Activity Tag and and receiver tag Because Widget work like Broad Cast receiver Class.So add the following code on place of red color code of above manifest file receiver name is the name of Java class which you extend form appWidgetProvider . and second in the we used resource widget_info which are the x